How to Do a Perfect DIY Manicure at Home - Step by Step Guide
Posted by Madhurashree Sistaco posted on October 18, 2024
(Updated on 12/5/2025)
A polished, professional-looking manicure doesn’t always require a salon visit or even the salon price tag. With the right tools, a little patience, and a simple step-by-step routine, you can create beautiful at-home manicures that look just as flawless as a professional set (you don't even need the experience of an expert).
Whether you’re new to diy home manicure routines or you’re simply looking to refine your technique, this guide walks you through how to do a manicure at home in a way that’s easy, relaxing, and actually enjoyable.
The key to a great homemade manicure is preparation. So, before you begin your DIY manicure, it's crucial to have all the necessary tools on hand. Having these tools ready will streamline the process and ensure you don't have to pause midway through your manicure.
Once everything is set, you’re ready to begin your DIY manicure at home.
Step 2: Remove existing nail colors
Use nail color remover to clean off any old color so you can start with a fresh base.
Step 3: Trim & File
Trim your nails using nail clippers to your desired length. Then, use a nail file to shape them. Common shapes include square, rounded, and almond, but feel free to experiment with the shape that suits you best.
File in one direction to prevent nails from splitting or weakening.
Step 4: Cleanse your nails
Fill a bowl with warm, soapy water and soak your hands for 5-10 minutes. This softens your cuticles and makes them easier to manage. You can add a few drops of essential oils or hand soap for a more luxurious experience.
Step 5: Buff Your Nails
Nail buffer will smooth the surface of your nails & help even out the ridges.
Step 6: Push back cuticles
Once your hands are dry, gently push back your cuticles using a cuticle pusher. If you have excess cuticle skin, you can trim it, but be careful not to overdo it. A healthy cuticle is essential for nail health!
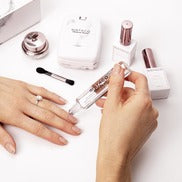
Step 7: Apply Cuticle Oil and Moisturize
Massage cuticle oil into your cuticles to nourish and hydrate them. Afterward, moisturize your hands with a good hand cream. Keeping your skin soft and hydrated will make the final look even more polished.
Step 8: Apply Base Coat
Apply base coat and cure under the lamp. It acts as a foundation for the nail powder application & also protects the nails from nail polishes.
Step 9: Apply Nail Color
Now comes the fun part - applying nail color of your choice!
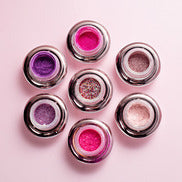
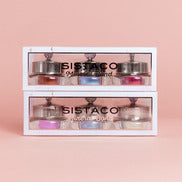
Apply any nail color of your choice. Here we are using Sistaco’s mineral bond nail powder, which is non-toxic & very easy to use. Gently dip the brush end vertically into the Sistaco’s nail powder. Gently brush onto the nail from base to tip in light strokes. Continue until the powder sets into the base coat.
Important note: Do not rub back and forth.
Step 10: Apply Top Coat
Once your color is dry, finish your manicure by applying a top coat. This adds shine, prevents chipping, and seals in your polish, helping it last longer.
A good top coat is the secret to a long-lasting, glossy finish.
Step 11: Clean up The Sides
Remove any excess powder. Now show off your flawless, diy manicured nails!
This manicure lasts for 2 weeks. Yes, you read it right. If you are using Sistaco’s nail system for your manicure, it’s quick, easy, non-toxic & lasts up to 2 weeks.
There are different types of manicures one can get done. Below is the list of different types of manicures that are popular now.
Different Types of Manicures
If you love experimenting (and we hope you do), here are some of the most popular (and classic) styles you can create.
Classic Manicure: For when you want to go simple and timeless.
French Manicure: For when the look needs to be clean and elegant.
(You can easily adapt these styles using Sistaco's Nail Kit)
Why At-Home Manicures Are Getting Popular
People are increasingly switching and specifically choosing at-home manicure systems, and for good reason:
They are more convenient: These systems allow you to do your nails whenever you want, no appointments, no schedule other than yours.
They are cost-effective: A few tools replace multiple salon visits.
They make customization easier: These systems adapt to you, not you to them. This simple statement means that you can switch colors, finishes, styles, types, etc., anytime you want.
You have 100% control: You pick the time, the place, and the system you want to use. Additionally, you can choose gentle, non-toxic products for healthier nails.
You can relax: A DIY manicure routine doubles as a little self-care ritual.
Whether you are aiming for a quick weekend refresh or a polished look for a special event, doing your nails at home gives full creative freedom.
Beginner Tips for a Better Experience
If you want to truly feel like an expert and want to perfect your nail routine, you should:
Avoid filling your nails after soaking. They are softer and more prone to tearing when soaked.
Always apply thin layers of product so you can achieve smoother results.
Never skip the base coat. It makes a huge difference in longevity.
Reapply cuticle oil throughout the week to keep nails hydrated.
File the edges lightly before reapplying the top coat, if your color chips.
Common At-Home Manicure Issues.
Color Looks Patchy?
You may be applying too much product at once. Remember to use thin layers.
Nails Feel Rough After Buffing?
Switch to a finger-grit buffer for a smoother finish.
Nail Powder Uneven?
Check that your base coat is smooth and fully set.
This simple DIY manicure routine can help you keep your nails looking fresh and salon-worthy anytime. With practice, you’ll perfect your technique and might never feel the need to book a nail appointment again!


How to Do a Perfect DIY Manicure at Home - Step by Step Guide
(Updated on 12/5/2025)
A polished, professional-looking manicure doesn’t always require a salon visit or even the salon price tag. With the right tools, a little patience, and a simple step-by-step routine, you can create beautiful at-home manicures that look just as flawless as a professional set (you don't even need the experience of an expert).
Whether you’re new to diy home manicure routines or you’re simply looking to refine your technique, this guide walks you through how to do a manicure at home in a way that’s easy, relaxing, and actually enjoyable.
Step-by-Step Guide to a Perfect Manicure at Home
Step 1: Gather necessary Manicure Tools & Products
The key to a great homemade manicure is preparation. So, before you begin your DIY manicure, it's crucial to have all the necessary tools on hand. Having these tools ready will streamline the process and ensure you don't have to pause midway through your manicure.
Once everything is set, you’re ready to begin your DIY manicure at home.
Step 2: Remove existing nail colors
Use nail color remover to clean off any old color so you can start with a fresh base.
Step 3: Trim & File
Trim your nails using nail clippers to your desired length. Then, use a nail file to shape them. Common shapes include square, rounded, and almond, but feel free to experiment with the shape that suits you best.
File in one direction to prevent nails from splitting or weakening.
Step 4: Cleanse your nails
Fill a bowl with warm, soapy water and soak your hands for 5-10 minutes. This softens your cuticles and makes them easier to manage. You can add a few drops of essential oils or hand soap for a more luxurious experience.
Step 5: Buff Your Nails
Nail buffer will smooth the surface of your nails & help even out the ridges.
Step 6: Push back cuticles
Once your hands are dry, gently push back your cuticles using a cuticle pusher. If you have excess cuticle skin, you can trim it, but be careful not to overdo it. A healthy cuticle is essential for nail health!
Step 7: Apply Cuticle Oil and Moisturize
Massage cuticle oil into your cuticles to nourish and hydrate them. Afterward, moisturize your hands with a good hand cream. Keeping your skin soft and hydrated will make the final look even more polished.
Step 8: Apply Base Coat
Apply base coat and cure under the lamp. It acts as a foundation for the nail powder application & also protects the nails from nail polishes.
Step 9: Apply Nail Color
Now comes the fun part - applying nail color of your choice!
Apply any nail color of your choice. Here we are using Sistaco’s mineral bond nail powder, which is non-toxic & very easy to use. Gently dip the brush end vertically into the Sistaco’s nail powder. Gently brush onto the nail from base to tip in light strokes. Continue until the powder sets into the base coat.
Important note: Do not rub back and forth.
Step 10: Apply Top Coat
Once your color is dry, finish your manicure by applying a top coat. This adds shine, prevents chipping, and seals in your polish, helping it last longer.
A good top coat is the secret to a long-lasting, glossy finish.
Step 11: Clean up The Sides
Remove any excess powder. Now show off your flawless, diy manicured nails!
This manicure lasts for 2 weeks. Yes, you read it right. If you are using Sistaco’s nail system for your manicure, it’s quick, easy, non-toxic & lasts up to 2 weeks.
There are different types of manicures one can get done. Below is the list of different types of manicures that are popular now.
Different Types of Manicures
If you love experimenting (and we hope you do), here are some of the most popular (and classic) styles you can create.
(You can easily adapt these styles using Sistaco's Nail Kit)
Why At-Home Manicures Are Getting Popular
People are increasingly switching and specifically choosing at-home manicure systems, and for good reason:
Whether you are aiming for a quick weekend refresh or a polished look for a special event, doing your nails at home gives full creative freedom.
Beginner Tips for a Better Experience
If you want to truly feel like an expert and want to perfect your nail routine, you should:
Common At-Home Manicure Issues.
Color Looks Patchy?
You may be applying too much product at once. Remember to use thin layers.
Nails Feel Rough After Buffing?
Switch to a finger-grit buffer for a smoother finish.
Nail Powder Uneven?
Check that your base coat is smooth and fully set.
This simple DIY manicure routine can help you keep your nails looking fresh and salon-worthy anytime. With practice, you’ll perfect your technique and might never feel the need to book a nail appointment again!
Still need help? This video might help you out: